The IUS Ceramics Studio has a comprehensive handbook with detailed notes on every material used in the studio. It is available for download here: IUS Ceramics Clay and Glaze Materials Handbook
How to apply glaze
- Glazes, slips, washes, and stains must be mixed thoroughly before using. Even if a glaze has been sitting for a few minutes between usage, it must be stirred again to insure that all materials are in uniform suspension.
- Glaze buckets must be kept closed (lids securely on) whenever not in use to avoid evaporation and contamination of glazes (many glazes look similar in the liquid state).
- Always use a clean damp sponge to wipe down your pieces before you glaze them. This removes dust and minimizes the possibility of the glaze crawling when fired. Also use a piece of silicon carbide shelf to grind down any sharp or ragged edges before glazing.
- Before applying glaze, always check the consistency. If it seems too thick, check it by dipping a bisque test tile into it. A single layer of glaze (held in the bucket for about 3-5 seconds) should produce a layer of glaze about the thickness of your thumbnail. If confusion persists, check with your ceramics professor – and never thin out a glaze before first checking with your professor
- Pouring and dipping are good methods to use whenever possible as they minimize messy layered dripping of the glaze. Always remember to allow excess glaze to run off a corner or specified edge of a piece until all dripping ceases. You may also apply glazes by brushing or spraying.
- If you need to spray the glaze on, you must do this on the back loading dock (the Annex). Remember that sprayed glaze always looks thicker than it is, so it is very easy to get a glaze application that is too thin. Try and remind yourself of the thumbnail thickness test. It is imperative that you clean the sprayer immediately after use so as not to allow the glaze to harden inside the spray gun. Always wear a mask when spraying.
- In most cases, the interior of a pot should be glazed first. Any drips can be removed with a damp sponge before applying glaze on the exterior.
- A layer of glaze should always be applied to the inside of the foot ring (on pots) to make sure the glaze compression is uniform. Flat-bottomed pieces obviously can’t be glazed this way.
- Glazes tend to run more when applied thickly and when layered with other glazes or washes. Keep this in mind when glazing and keep an eye on the thickness as it develops on your pieces. If your glaze application cracks significantly when drying, you can be sure that your glaze is too thick. In this case, wash off all glaze and thoroughly dry the bisqued object before re-glazing.
- Glaze on the base and bottom of your object must be wiped off thoroughly (at least 1/8 to ¼ inch from bottom)
- Never leave even a teeny weeny mess for someone else to clean up – this includes the floor, sink, and tables. Always return glaze buckets (with the lid on) to their proper storing place
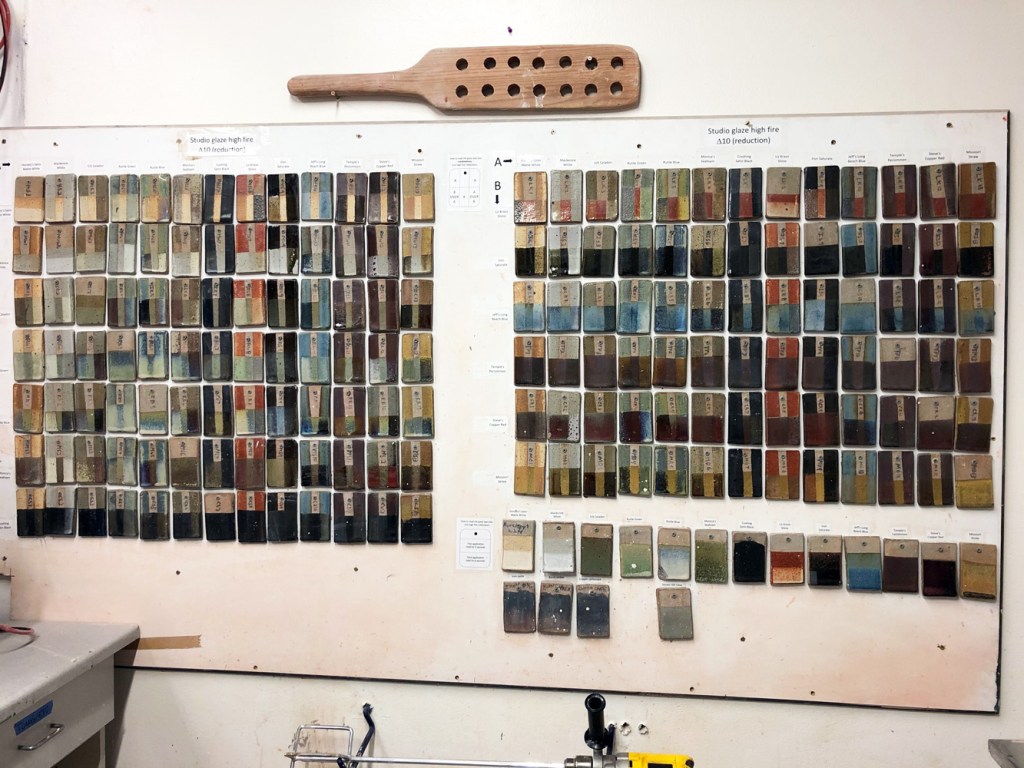
Behold the Wall of Color …
The Wall of Color shows every over/under combination of all 13 of the cone 10 glazes we keep stocked in the glaze room. The way to use it is to pick out a corner of a tile you like, then read the guide in the image above and to the right. If you like the bottom right corner of the tile, you’ll need to put glaze “A” over glaze “B”. On the Wall of Color, the names listed across the top of the board are your “A” glazes, the names listed vertically are your “B” glazes. If the guide tells you “A over B”, then you need to apply the glaze listed as “B” FIRST, then apply the glaze listed as “A” OVER that.